Showing posts with label home made drink. Show all posts

Thursday, 26 March 2020

Seasonal Stinging Nettle Beer

The whole world has changed significantly since my last post. I hope you and your families are all staying safe, well and ideally in your homes.
My allotment gets a wealth of Stinging Nettles around this time of year, which are used in many traditional recipes, they can even be made into twine or woven into fabric. However, I wanted to make something seasonal that would take a couple of weeks to mature, but also be something that we could enjoy, even if we had to stay home a lot.
I have always fancied making Stinging Nettle Beer; it is a very simple recipe and anyone with the basic equipment can try it. You can safely tinker with both the amounts and method, according to your equipment and requirments. I found making this very satisfying and enjoyed the process so much that I did it all twice, and may do it again soon.
Equipment

  • Gloves!
  • Large carrier bag or similar
  • Bucket
  • Demijon, barrel or brewing bucket
  • Suitable pressure safe bottles
Ingredients

  • 1kg Stinging Nettles - approximately one large carrier bag stuffed to bursting.
  • 400g - 1kg Sugar - the strength of the beer will depend on the amount you use, you could mke it weaker still, like ginger beer for kids
  • 1 x Lemon juiced
  • 1 x gallon of water (I used a demijon)
  • 25 g Cream of Tartar
  • Yeast
Method

  1. Pick the stinging nettles (using gloves), collect only the tips, or top 6" of the plants and stuff them into your big carrier bag. Pack them down well, it takes about 30 minutes.
  2. Boil the water and gradually add the nettles, they will eventually boil down and should all fit in. I used a large preserving pan, but you can adapt the amounts according to your needs and available equipment.
  3. Let the nettles simmer for 15 minutes, then strain the liquid off. I used a collander over a bucket to achieve this and it worked very well.
  4. Add the sugar, Lemon juice and Cream of Tartar to the liquid and stir untill all disolved.
  5. Leave the liquid to cool to body temperature and sprinkle the yeast on top.
  6. At this point I added the liquid to my demijon but you could also leave it in a bucket covered with a muslin cloth / tea towel.
  7. Leave to ferment for a week
  8. Siphon into bottles and leave for a further week.
  9. Drink!
    My Improvised Standing Work From Home Station
Stay Safe and Keep Healthy

Thursday, 28 November 2013

Sloe Motion


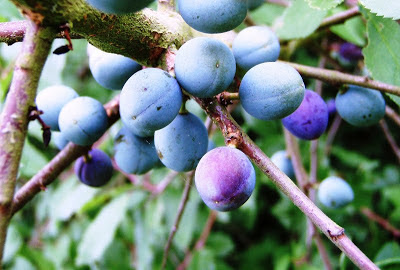
These May Actually be Tiny Damsons but they are Related and Will Do
When the first frosts of November arrive, we all start digging out the warm clothing and Winter gloves. Around this time, my mind also turns to toward the bountiful Blackthorn bush. It has been a prodigious Autumnal harvest for most fruit and nuts this year and Sloes have been no exception; they seem to be everywhere you look.
These are Definitely Sloes
Blackthorn provides us with two chief pleasures; in Spring, it is one of the first trees to blossom, smothering the hedgerows with its pretty white bloom. It flowers along with its close relative, the plum and proclaims the seasonal change. Then, as Winter approaches, we benefit from its late fruit, Sloes.
Blue Black Bloom
Tradition has it that the Sloes should be picked after the first frost. I normally wear cycling gloves, to save my fingers from the prickly thorns and purple stains, as much as the chilly air. The most popular pastime with this fruit is to make Sloe Gin, a tasty, plummy nip for those cold Winter nights.
Sloe Wine Fermenting
I picked so many juicy beauties that I had enough to make a bonus gallon of Sloe wine, but Sloe Gin is always the blue/black jewel in November’s crown. This seasonal drink can make a delicious Christmas gift; in a small, decorative bottle. Alternatively a small glass can be the perfect companion to a platter of cheese and biscuits, maybe accompanied by tangy home-made chutney and a few slices of apple…
Sloe Gin Infusing
Someone turn the TV on and ring for the butler!

Monday, 24 June 2013

Get Busy with the Fizzy

Last Saturday the weather was boiling, my son and I had an hour or two to spare, so we decided to get busy with the fizzy. We set about making Elderflower Champagne - Yum! Oh, and some sweet cordial for the kids too.
Folklore states, that if you stand beneath the Elder tree during midsummer, you might see fairies; this is much more likely if you have already been at the Elderflower champagne! With this in mind, we equipped ourselves with a large carrier bag and walked off down the road to pick a bag-full of blooms from these ubiquitous guardians of the hedgerows. 
The citrusy Elderflowers are one of the quintessential aromas of Summer, along with freshly mowed lawns and thundery rain on hot tarmac. A good friend of mine says that you should always pick your Elderflowers in the morning because they can smell more like cat’s wee in the evening (nice!) – so take heed.
It only took us about half an hour to pick 50 or so heads, then we headed back, buying the other ingredients on the way home. We saw bushes with at least 200 flowers on, so there's plenty left for Elderberry Port later in the year.
 
While I cleaned all the buckets, pans, sieves and recycled bottles my son was counting and stripping the flowerheads from the stalks and leaves, which should not be included.
In a fairly short time, everything was done, then we just had to wait two days, although my helpers always get a glassful before it’s properly ready. Needless to say, both buckets needed testing and both got the thumbs up from the kids. We made several pints of Cordial and about two gallons of Champagne (it was a big hit last year and we ran out too soon).
The champagne takes two weeks to ferment, till then the kids are making do, on a diet of delicious Wild Strawberries and the Elderflower cordial, which was ready in two days.

Saturday, 1 December 2012

Delightful (Home-Made) Drinks

The British Government has made a proposal for minimum unit prices on alcohol. This legislation is not about abstinence but is designed to turn the tide on the reckless drinking culture that exists in some groups of people, for health reasons. Although this regulation is not designed to punish responsible drinkers, a new era of prohibition might persuade more people to try home brewing and start making their own country wines.
I have experimented, with making my own wine, beer and cider for many years; like a young boy with a chemistry set, I relish the alchemy of it all. So, I thought it would be useful to create a simple guide here, to show how easy it is to accomplish and also how entertaining it can be.
Cost-wise, there are obvious clear savings to be made; a basic starter kit is inexpensive and much of it can be found for free or will be available from your local recycling centre / Freecycle site. Always make sure all equipment is Food Safe.
Essential Kit List...
You may want to buy an inexpensive hydrometer, although this is not actually necessary, it does give you more control over the flavour and alcoholic content of your hooch.
A full demijohn will produce one gallon of wine, which amounts to about six bottles. However, as with home baking, producing your own drinks is not only about saving money, I simply enjoy the process. You will be unlikely to create something that tastes exactly the same as what is available in the shops but this is part of the fun. As well as being exciting, wine making is also easy, recipes and advice are readily available all over the internet, I tend to rely on the spirit of adventure as much as heavily stained archaic books.
Your friends and family may playfully mock your endeavours - mine do - but you can guess what I’m going to give them for Xmas!
Always Drink Responsibly J
Some strange and interesting drinks we have made are listed below...

Wednesday, 18 July 2012

Ginger Beer


I was wondering what to do with a young boy on a very rainy Saturday, when it suddenly occurred to me that we had not yet made our summer quota of Ginger Beer.
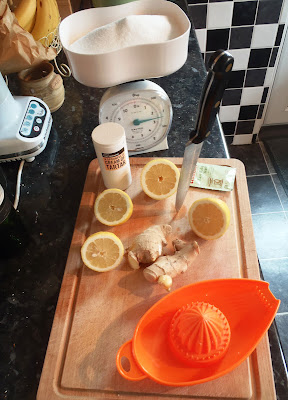
We dashed out to the local shops under the cover of an umbrella and then scrambled back home with lemons, too much root ginger and a bag of sugar. I already had yeast and cream of tartar from in my wine making equipment.
The next step was to clean the bottles, this kept my son busy while I sliced and squeezed the lemons. I also let him smash the root ginger up with the pestle and mortar.
The rest was boiling water and yeast preparation. Once bottled, we left the mixture for one night, and then we skimmed off the solids with a sieve and bottled it.

The next day we had lovely fizzy Ginger Beer with our tea plus enough to last us for a few weeks more.